Science > Physics > Units and Measurement > Measurement of Length, Area, and Volume > Use of Metre Scale
Physics is a science of measurement. In science and engineering, we perform experiments. During experiments, we have to take readings. Thus all these experiments require some measurements to be made. During the production of mechanical products, we have to measure the parts so as to find whether the part is made as per the specifications. Thus measurements are necessary for production and quality control. A measurement is a quantitative description of one or more fundamental properties compared to a standard. To measure length is a very important step during the performance of experiments. Measurement can be done directly or indirectly. For direct methods metre scale, vernier callipers, micrometre screw gauges are used. In this article, we shall study the use of metre scale to measure length, diameter, etc.
When measurements are taken directly using tools, instruments, or other calibrated measuring devices, they are called direct measurements. e.g. Measurement of the length of a table by metre scale. When the measurement must be done through a formula or other calculations, the measurement is called indirect measurement. e.g. Measurement of the radius of the Earth.
Old Methods of Measurement of a Length
To measure lengths units used were a finger, palm, span, cubit, foot, yard, fathom, furlong etc. The length of an inch was originally decided by Edward-II of England in the early 1300s as the length of three grains of barley laid end to end. Inch was divided into three parts called barley.
Measurement of Length:
The length is a fundamental quantity, it is used to measure a distance between two points in space. S.I. unit of length is a metre (m) and c.g.s. unit of length is centimetre (cm). Other practical units of measurement of length are micrometre (mm), millimetre (mm), kilometre (km), Angstrom (A°) etc.
Length of accessible objects can be measured directly using a metre scale, vernier callipers, micrometre screw gauge, measuring tapes, travelling microscopes etc. Length of non-accessible objects is measured indirectly.
Metre Scale:
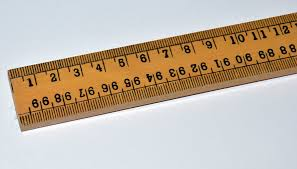
one metre is divided into 100 equal parts, each part is called centimetre. Each centimetre is divided into 10 equal parts, each part is called millimetre. Engineering metre scale has centimetres marked on one edge and inches marked on another edge. Centimetres have decimal divisions while inches have fractional divisions. metre scale may have bevelled edges to avoid errors due to parallax.
Least count is the smallest measurement that can be taken accurately with an instrument or device. The least count of a metre scale is 1 mm or 0.1 cm.
Linear Measurements (Direct Method):

Place the metre scale along the object so that the ‘0’ mark on the metre scale coincides with one end of the object and reading at the other end of the scale indicates the length of the object. To avoid wear and tear off the end of the scale, sometimes the scale is placed along the object and readings at the ends of the object are taken. The length of the object is obtained by subtracting higher reading from lower reading.
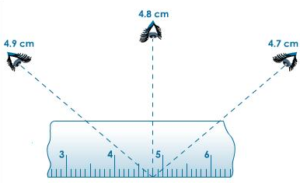
The eye must be kept vertically above the end of the object so that the corresponding graduation can be read clearly. If the eye is not kept exactly vertically above the end of the object, it leads into error called parallax error.

In case, the end of the object lies between the two small divisions of the scale, the correct length is reported by noting the marking nearer to the end of the object. Limitation of metre scale is that it cannot measure the length of an object smaller than 1 mm or 0.1 cm.
Measurement of Length of a Curve
Thread Ruler Method (Direct Method):

In this case, a thread is laid along the curve. Then the length of the thread is measured using a metre scale.
Divider Ruler Method (Direct Method):

In this method, the curve is divided into small straight segments. Length of each such segment is measured using divider and scale. Then the total length of the curve can be obtained by adding lengths of all individual segments.
External diameter of cylinder or sphere
Blocks Ruler Method (Direct Method):

A cylinder or sphere whose external diameter is to be measured is placed between two blocks. The reading on the scale corresponding to the inner edge is x cm while that corresponding to the outer edge is y cm. Then the diameter is the absolute value of (x-y) cm.
Caliper Ruler Method (Direct Method):

To measure the external diameter of sphere or cylinder, an external calliper is used. In this method, the cylinder or sphere whose external diameter is to be measured is placed between two jaws of the calliper. The position of the calliper is fixed by tightening the screw. The distance between the jaws gives the external diameter of the cylinder or the sphere.
External Diameter of Cylinder: (Indirect Method):

A known number of turns (N) of a thin wire are wound on a cylinder whose diameter is to be measured. Then the wire is unwounded and straightened. Then its length is measured. The diameter of the rod can be obtained by the formula

To measure the internal diameter of the cylinder, an internal calliper is used.

External Diameter of Thin Wire: (Indirect Method):

A known number of turns of the wire whose diameter is to be measured are wound on a scale or on a rod of uniform diameter. The length of turns on the scale or the rod is measured. The diameter of the wire is calculated by dividing the length of turns by the number of turns.
For More Topics in Measurement of Length, Area, and Volume Click Here